Welcome Guest! Be sure you know and follow the Phorum Rules before posting. Thank you and Enjoy! (January 12) x

Thread Closed
Thread Rating:
  • 0 Vote(s) - 0 Average
  • 1
  • 2
  • 3
  • 4
  • 5

Sanding Veneer -Grain Filler handling
#1

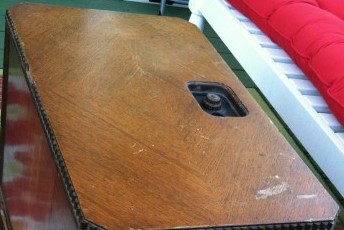
What is the best way to sand the cabinet surface when you have different orientations of the veneer intersecting each other. Top of my 370 pictured.

Also in one of PuhPow’s threads there was mention of the care in handling the cabinet (my 40-155) after the grain filler was rubbed out. Taking care not to get contaminants from your hands on the surface that might affect the quality of the finish. Let’s say "your friend" forgot to have gloves on when you (oops I mean he) handled the cabinet. So as to not to disturb the grain filler what would be the next step in cleaning to insure good adhesion when the toning lacquer is applied?

Thanks
Roy G
   
#2

Why are you sanding it? I usually just strip and refinish. If you have to sand it, I suggest doing your best to sand with the grain. You don't have to be perfect. I try to not handle the wood bare handed to avoid fisheyes. I don't know for sure if handling it causes them, but I am paranoid about anything that might cause a fisheye. Go over it really good with a tack rag before you spray any lacquer. I'm not an expert, so someone else might have a better idea.

The artist formerly known as Puhpow! 8)
#3

I use lacquer sanding sealer (or shellac) over the grain filler. It does a pretty good job sealing in any contamination. Not that your hands are likely to contaminate it anyway. Your much bigger worry are silicones from spray polished like "Pledge" or Magnolia "Glayzit".
#4

PuhPow, I am sanding because there are some gouges in the surface that requires wood filler.

thanks
Roy G


Users browsing this thread: 1 Guest(s)
[-]
Recent Posts
Atwater-Kent 84, restoration.
Hello Mike, Wow ! far as my AK it does work and the cabinet is in nice shape so is my chassis anyway here is a photo of...radiorich — 02:59 AM
Atwater-Kent 84, restoration.
Nice radio, Mike! Here's hoping it was well rebuilt. Take care and BE HEALTHY! GaryGarySP — 12:12 AM
Atwater-Kent 84, restoration.
Rich yes, this is the way I got it. I have just put it on the table and took it apart. I suspect it even might work,...morzh — 11:31 PM
Atwater-Kent 84, restoration.
Hello mike, What nice looking radio I have one AK in my collection it's a console I have not started restoring it yet ....radiorich — 11:21 PM
91H Code 126 Restore
Just to make it more confusing here is another model 91 schematic that doesn't show parts with dotted lines in that spot...Arran — 10:37 PM
Atwater-Kent 84, restoration.
The wires were desoldered from the can, and the capacitors checked. All checked at 0.102 uF, which is correct. So the c...morzh — 09:41 PM
An attempt to remove the Field Coil from a G speaker
Arran Yours probably then the H speaker, same as mine.morzh — 08:39 PM
An attempt to remove the Field Coil from a G speaker
Mike; I would like to have a look at the speaker in my model 96, but the set is packed into a corner in the basement. ...Arran — 08:04 PM
91H Code 126 Restore
Thanks Arran, I'm convinced the power cord is good but have a nice repro plug for it. Would it be prudent to add a fus...RealRider — 07:28 PM
91H Code 126 Restore
As I was studying this schematic I was wondering what does this dotted line means?  I haven't traced it out yet. An o...RealRider — 07:22 PM

[-]
Who's Online
There are currently 3035 online users. [Complete List]
» 2 Member(s) | 3033 Guest(s)
AvatarAvatar

>