Posts: 60
Threads: 14
Joined: Oct 2008
City: Pequot Lakes, MN
Hello Forum-
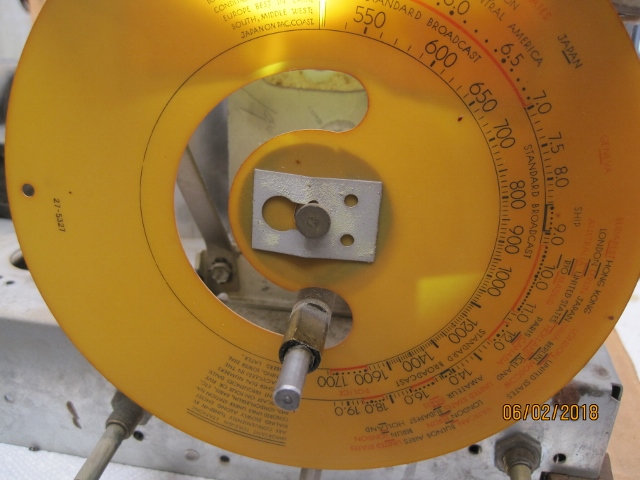
I'm now continuing working on this Philco 38-9 for a friend.
I need to safely remove the plastic dial from the tuning shaft before I accidently damage it!
What is the best safest way to remove this very fragile part from the tuning shaft?
Thanks G.

Posts: 60
Threads: 14
Joined: Oct 2008
City: Pequot Lakes, MN
The next problem here:
The pilot lamp is stuck into its socket, from corrosion. I have been using WD 40 but no help.
How can this be removed without damaging the socket? I know I will have to repair the wiring at the socket.
G.
Posts: 120
Threads: 15
Joined: Aug 2017
City: Fort Worth
State, Province, Country: TX
Are you sure it's corrosion? Read Ron's thread at
http://philcoradio.com/phorum/showthread...pilot+lamp. I had the melted rubber problem and used a heat gun to soften the rubber so that I could then push in and twist to remove the bulb. I then followed Ron's instructions to rebuild the light socket.
Posts: 1,532
Threads: 242
Joined: Sep 2012
City: West Bend, Wisconsin
It takes a bit of finesse to remove the dial scale. I've done it with a duckbill needle nose pliers but you need to be very careful.
All that needs to happen is to slide that metal clip to the right so the hole in it is over the shaft. Then just take the clip off and remove the dial.
Perhaps with a dot of oil on the shaft you may even be able to slide it over with your fingers.
Greg V.
West Bend, WI
Member WARCI.org
Posts: 60
Threads: 14
Joined: Oct 2008
City: Pequot Lakes, MN
Larry
&
Greg
Thanks for your suggestions. I was successful fixing both problems.
The lamp socket was blocked by the rubber insulation on the wires. Using the heat gun, the rubber softened enough to fall apart and I could push the lamp out of the socket.
A spot or two of oil and a large pair of pliers to pry off the clip did the job on the plastic dial and no damage.
I am a happy camper and can proceed with cleaning and repairing the chassis.
G.
Posts: 1,824
Threads: 114
Joined: Jul 2014
City: Sneedville, TN
Good to hear of your success ! Keep us abreast of your work, and don't hesitate to ask questions. There are folks here who are VERY knowledgeable about these radios, and some who have probably tackled the same model. They will be able to give you tips and help when you run into problems.


![[-] [-]](https://philcoradio.com/phorum/images/bootbb/collapse.png)


