Posts: 1,887
Threads: 214
Joined: May 2015
City: Seattle
State, Province, Country: WA
Very impressive with the replating.
I’ve been just dusting with a small brush and vacuum - then spraying with contact cleaner. Works decent but Mike your dishwasher would do a bit better than what I’ve been doing.
Posts: 1,192
Threads: 49
Joined: Oct 2017
City: Allendale, MI
I've put many in the dish washer. Works good.
Nathan, do you have a scan of the patent label for the 20? I couldn't find one in the Library, just the tube layout.
Posts: 1,887
Threads: 214
Joined: May 2015
City: Seattle
State, Province, Country: WA
Unfortunately no scan of the model 20 patent label (yet). The 20 I have currently has a patent label but missing too much to make a decent source.
I didn't realize that RadioDaze made them but for what it's worth they do have it: https://www.radiodaze.com/philco-20-mode...lbl-ph-20/
Posts: 142
Threads: 28
Joined: Dec 2016
City: portland, OR
what do you replate the tuning cap with? and how? is it a DIY process? seems to me you'd want the chassis to look as nice, too. and that would keep you occupied for a while. 
Posts: 1,192
Threads: 49
Joined: Oct 2017
City: Allendale, MI
It's tin plated, DIY. Not very original but I was playing with it. There was some rust so some of the original plating was gone. I didn't want it to rust again so I tin plated it. Tin is much brighter than what was used originally. the tin will oxidize over time (just look at the typical tube shield). Unfortunately, it is very difficult to do the chassis. The aluminum shields are spun on and all of the sockets would have to come off. It cleaned up pretty good but definitely is a different color than the tuning cap. The rust that was on the chassis was very light and came off without rust pitting. Not sure if these things are cadmium plated or zinc plated. I'll need to put some sort of film on it to keep it from rusting again. I suspect that zinc plating on the cap would have looked much more like the chassis but I don't have zinc plating capability yet.
Nathan, I didn't realize RD had that! Thanks, but I was able to salvage the original. Not perfect but at least original, not that the radio is going to look exactly original, but...
All of the resistors underneath (except WW) are between 50 and 300% over value so I may try making some. There are only 5 and they are all the same physical size so shouldn't be too bad. they are the type with the molded lead ends so a bit more difficult than the type with the wire wrapped around the end. I probably could get by with hiding a parallel resistor underneath.
(This post was last modified: 12-17-2020, 02:40 AM by rfeenstra.)
Posts: 4,838
Threads: 54
Joined: Sep 2008
City: Sandwick, BC, CA
What I do with chassis rust spots is to treat them with phosphoric acid, which I have in both a cleaning product I found, and in a type of rust remover. In any event it seems to prevent the steel from rusting again, I guess by converting the iron into iron phosphate, they call it pickling I think. The rust remover was called "Removall" but I don't think you can get it anymore, it would turn the steel grey after the rust was removed, unless you polish it afterward.
Regards
Arran
(This post was last modified: 12-17-2020, 03:35 AM by Arran.)
Posts: 2,118
Threads: 112
Joined: Jun 2010
City: Medford OR (OR what?)
The bluish-grey tone of the original plating makes me think that it was zinc plated. Cadmium is greenish - just stay away from that. Never scrape sand or brush cadmium without the proper PPE.
"I just might turn into smoke, but I feel fine"
http://www.russoldradios.com/
Posts: 16,383
Threads: 573
Joined: Oct 2011
City: Jackson
State, Province, Country: NJ
Rob
Chuck Paci should have some made.
People who do not drink, do not smoke, do not eat red meat will one day feel really stupid lying there and dying from nothing.
Posts: 1,192
Threads: 49
Joined: Oct 2017
City: Allendale, MI
I've emailed Chuck. I'll see what he has. Thanks!
Posts: 1,192
Threads: 49
Joined: Oct 2017
City: Allendale, MI
A no from Chuck. I installed the original resistors with a parallel resistor hidden underneath. Someday, if it ever comes, I'll make new ones! I know Steve makes dog bone's but I don't think this style.
(This post was last modified: 12-18-2020, 01:27 PM by rfeenstra.)
Posts: 2,118
Threads: 112
Joined: Jun 2010
City: Medford OR (OR what?)
This kind?

"I just might turn into smoke, but I feel fine"
http://www.russoldradios.com/
Posts: 1,192
Threads: 49
Joined: Oct 2017
City: Allendale, MI
Yes, Russ, only they are quite a bit larger. Do you have aplace on your blog that demonstrates how yo make those?
Posts: 2,118
Threads: 112
Joined: Jun 2010
City: Medford OR (OR what?)
I have been looking and haven't found any good pictures of the processes.
There are at least two ways I have done this.
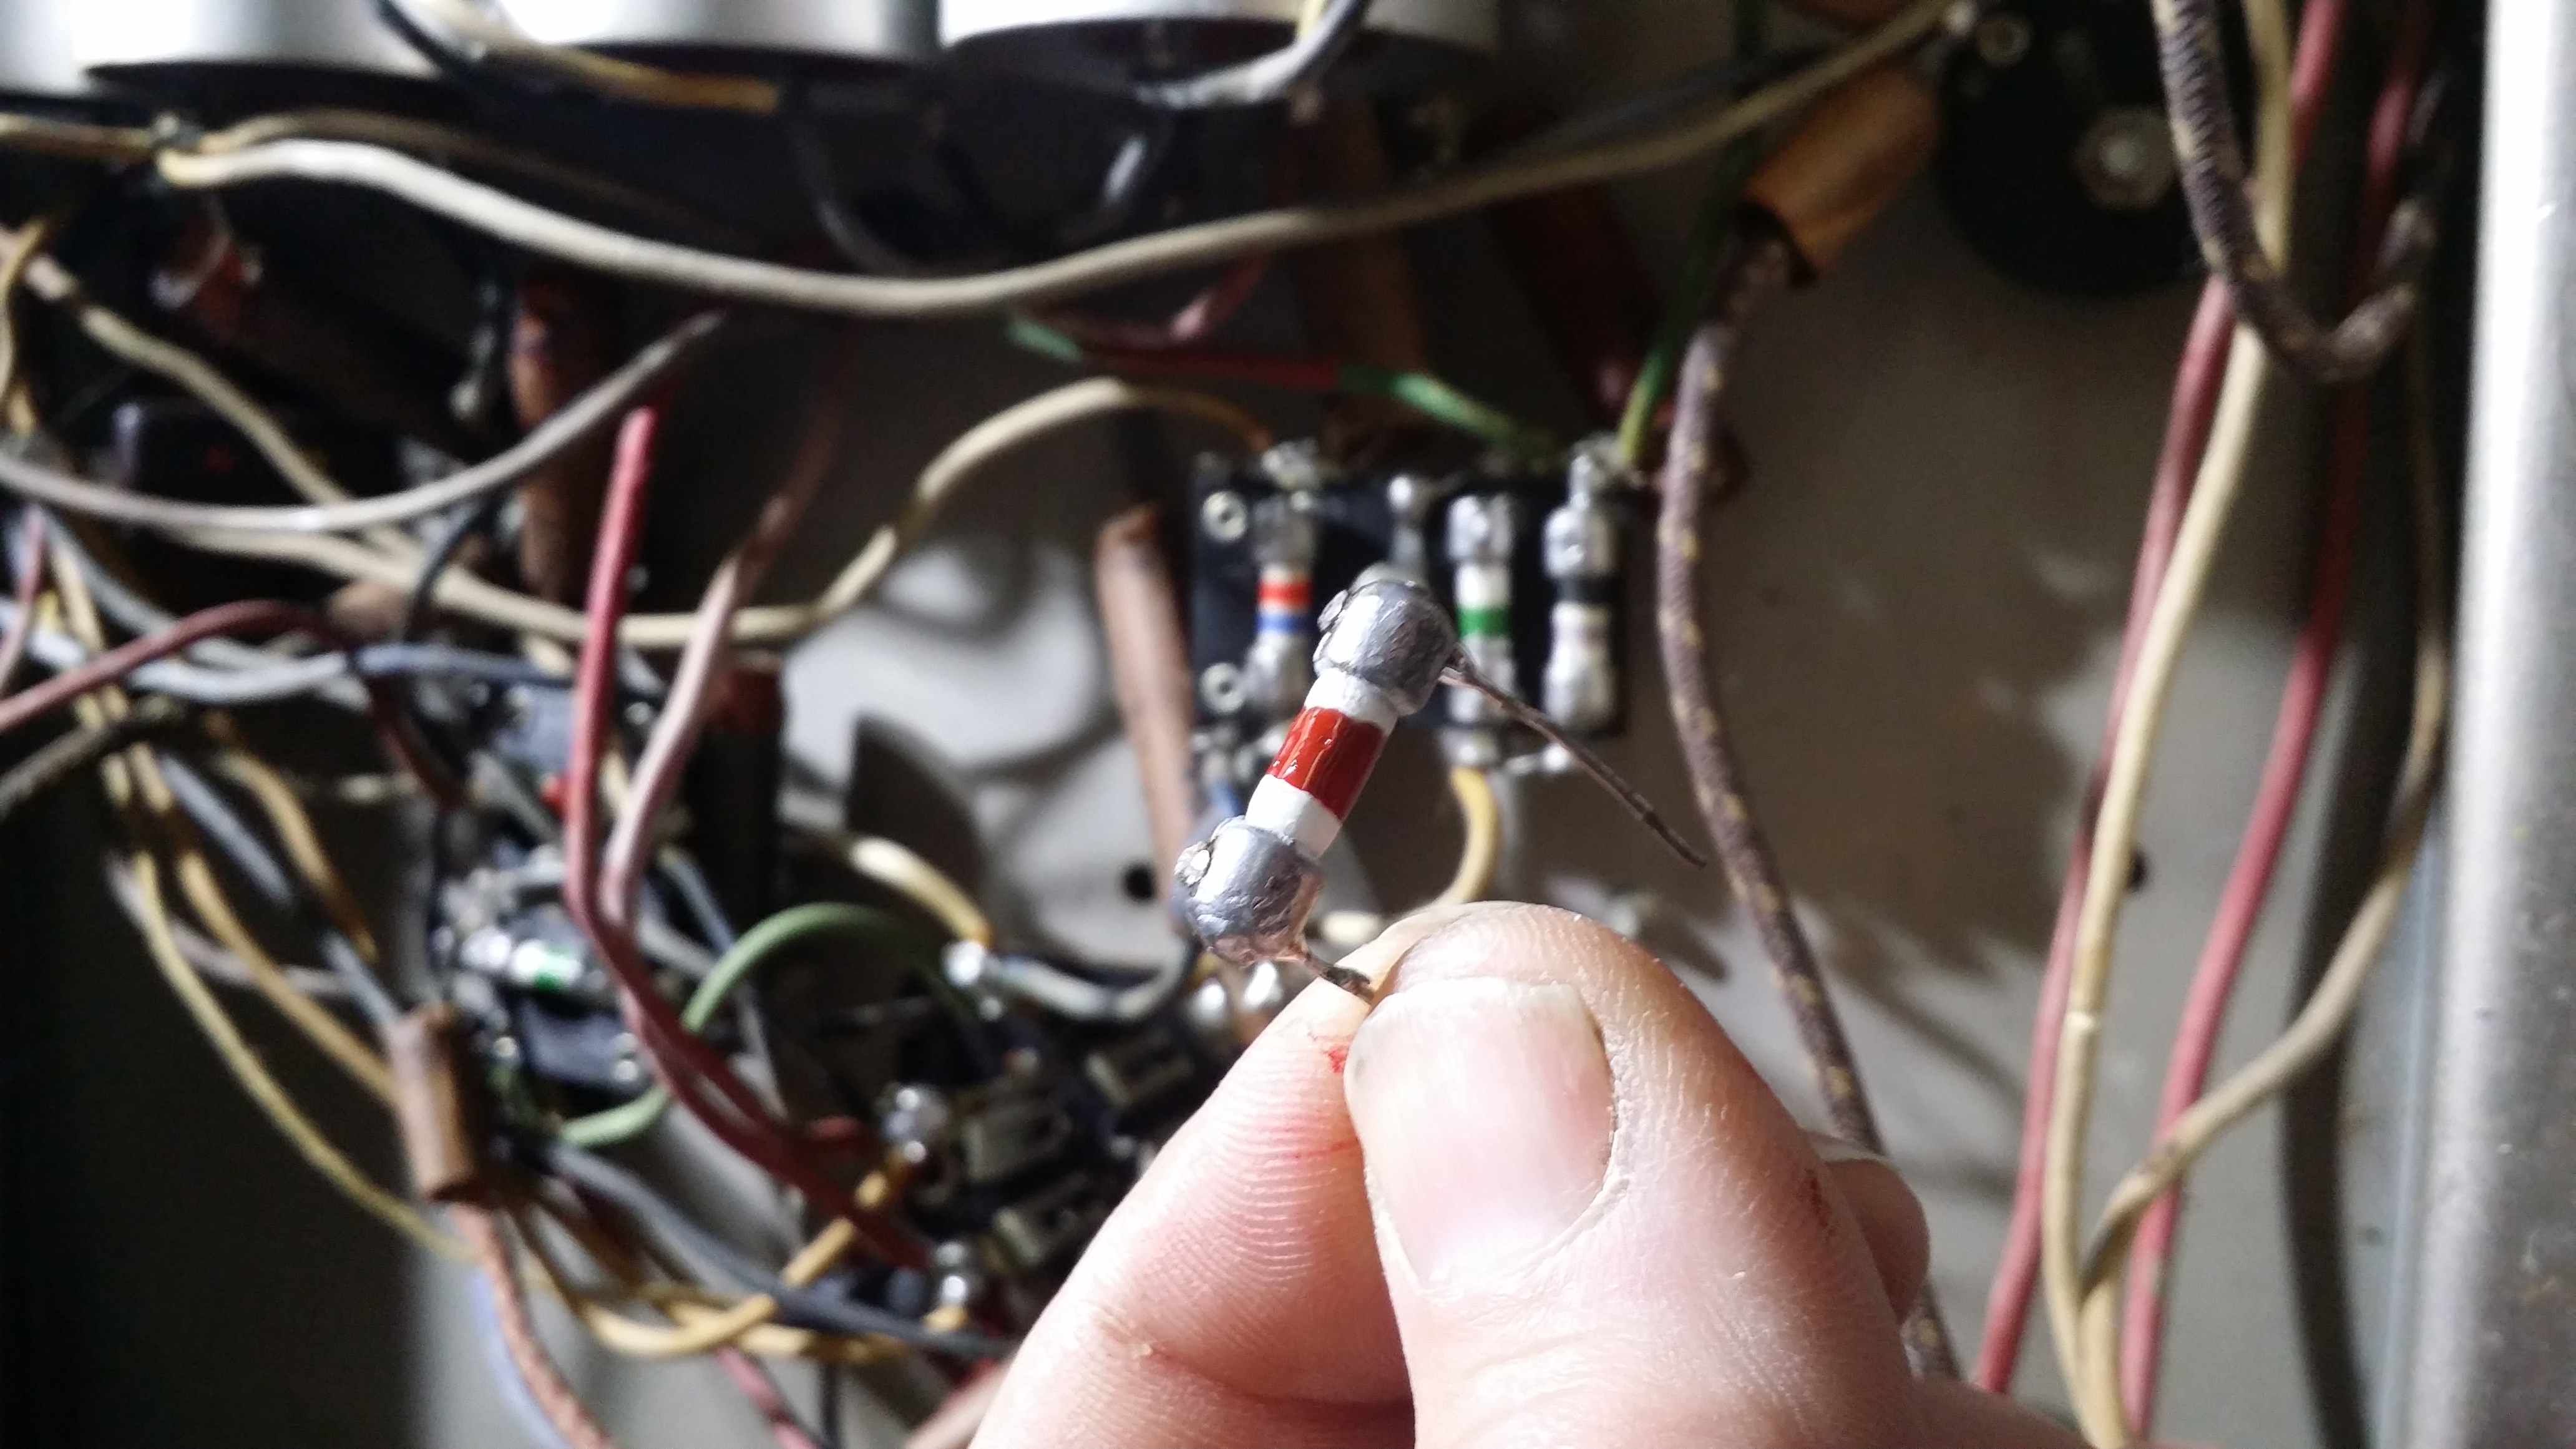
Pictured is a resistor that has the original lead (Pb) ends (metal - no paint). These are made by removing the ceramic center (white part) and replacing it with a glass (preferable) or plastic tube. There are Pyrex tubes with the proper outside diameter for most of these, BUT, their inner diameter might limit the size of the replacement (watts). A plastic tube might allow for larger inner diameter but resistance to heat is diminished.
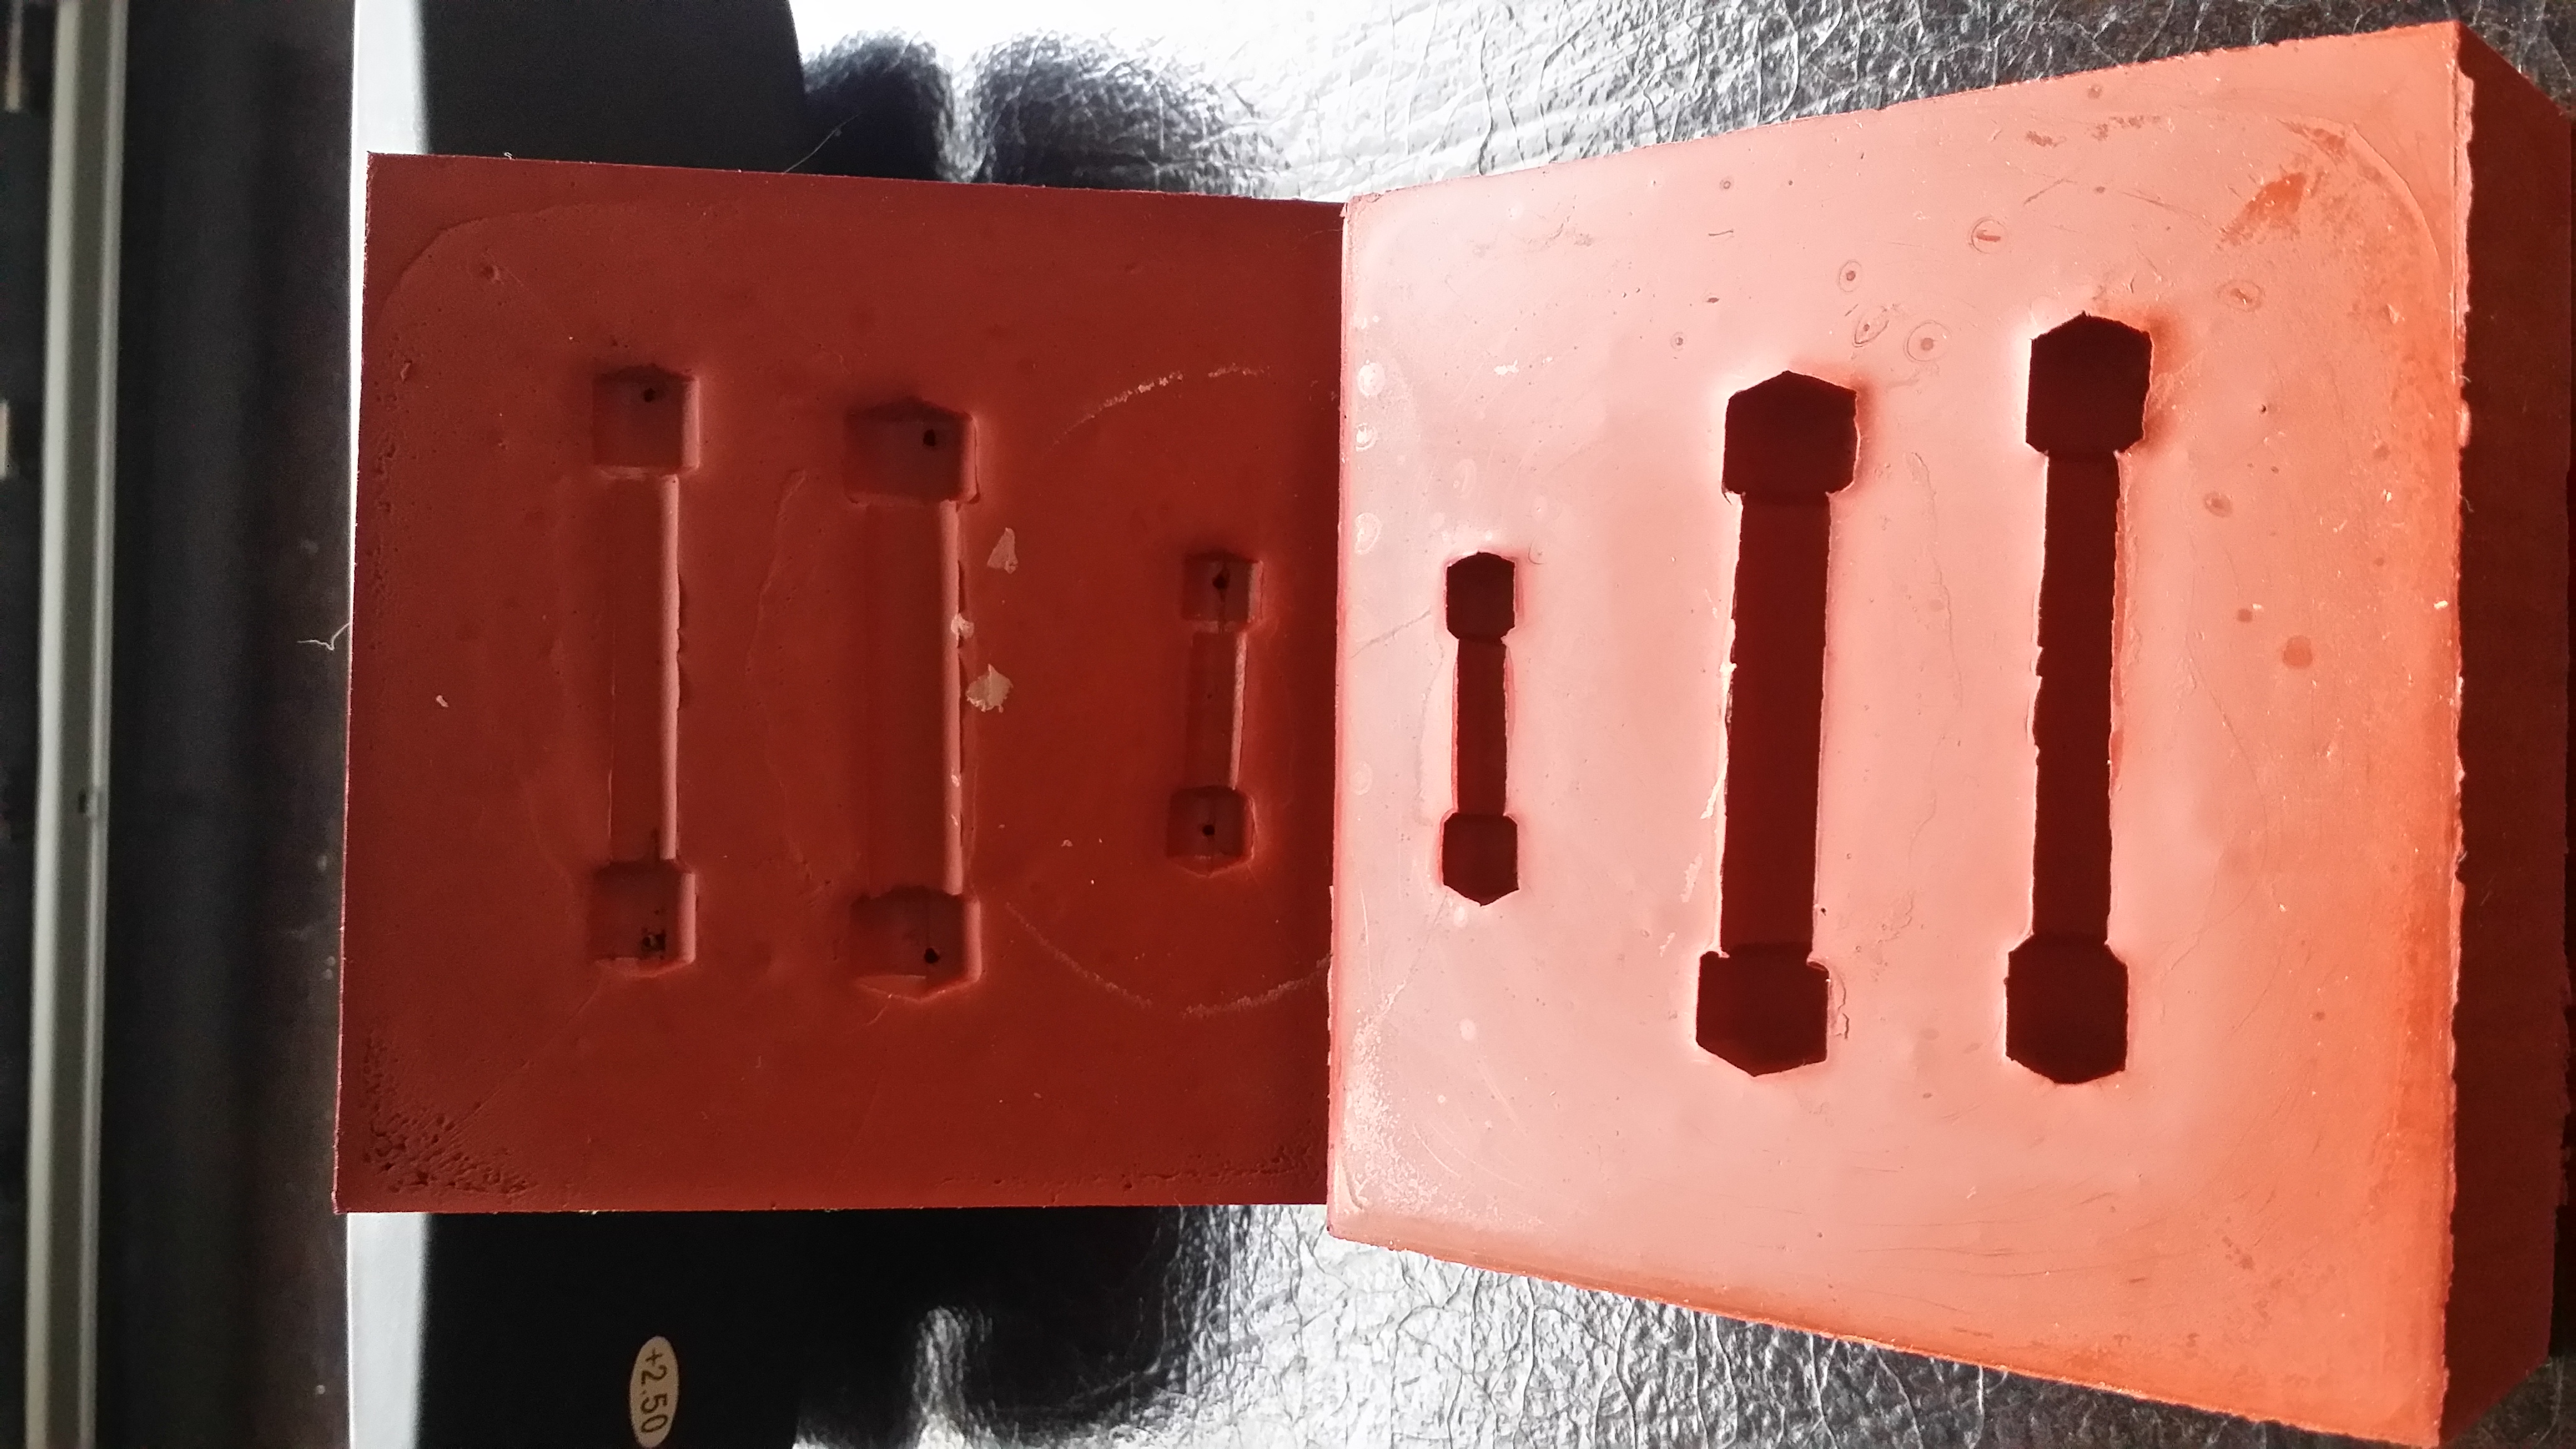
The second, and far easier, way is to mold the whole thing and paint it. I will get a picture of the mold posted when I get over to the shop.
"I just might turn into smoke, but I feel fine"
http://www.russoldradios.com/
(This post was last modified: 12-19-2020, 12:30 PM by Phlogiston.)
Posts: 1,192
Threads: 49
Joined: Oct 2017
City: Allendale, MI
Posts: 2,118
Threads: 112
Joined: Jun 2010
City: Medford OR (OR what?)
Hi-temp silicone -

"I just might turn into smoke, but I feel fine"
http://www.russoldradios.com/
Users browsing this thread: 1 Guest(s)
|
|
Recent Posts
|
|
Gloritone 27 Radio
|
| I have a model 27 that someone painted the cabinet brown. I've been trying to sell it for awhile but the cabinet paint m...Jim Dutridge — 02:30 PM |
|
Restoring Philco 96
|
| Joseph
Yeah. The situaction is complicated by me living with my family in NJ while mom is in FL.
Were it not for my ...morzh — 10:55 AM |
|
Restoring Philco 96
|
| Best of wishes for your mother. I hope she recovers well. My mother struggles with sciatic pain as well, so I am familia...jrblasde — 10:41 AM |
|
Restoring Philco 96
|
| Well, because I am away, I cannot check it. Hope mom becomes better enough for me to get back.
I think I will be here f...morzh — 10:27 AM |
|
Restoring Philco 96
|
| Nice find! I hope it completes your console.jrblasde — 08:45 AM |
|
Gloritone 27 Radio
|
| Hello john,
That, is the first time I have have seen or heard of that brand and model.
Welcome to the party !!
Sincer...radiorich — 08:08 AM |
|
370 Norman Bel Geddes trim pieces
|
| Thank you! I’ll probably use the half-round molding and tone it to match the original. Thanks for the replies!Max T — 06:34 AM |
|
Gloritone 27 Radio
|
| I'm kind of late to this thread, but Buzz1151 has a 3 part restore series on the model 27:
A little bit of extra t...Eliot Ness — 05:48 AM |
|
370 Norman Bel Geddes trim pieces
|
| You can get half-round moulding in various diameters at any home improvement store. That way the flat edge is uniform. ...GarySP — 12:03 AM |
|
42-345 Resistors
|
| Great comments.
I have a tinkering bench at my office, and that's where Little Phil is right now. I will have to comb ...proftrussell — 11:12 PM |
|
Who's Online
|
There are currently 1549 online users. [Complete List]
» 1 Member(s) | 1548 Guest(s)
|
|
|

|
 
|


![[-] [-]](https://philcoradio.com/phorum/images/bootbb/collapse.png)


