Posts: 599
Threads: 24
Joined: Jan 2014
City: Edmonton AB CA
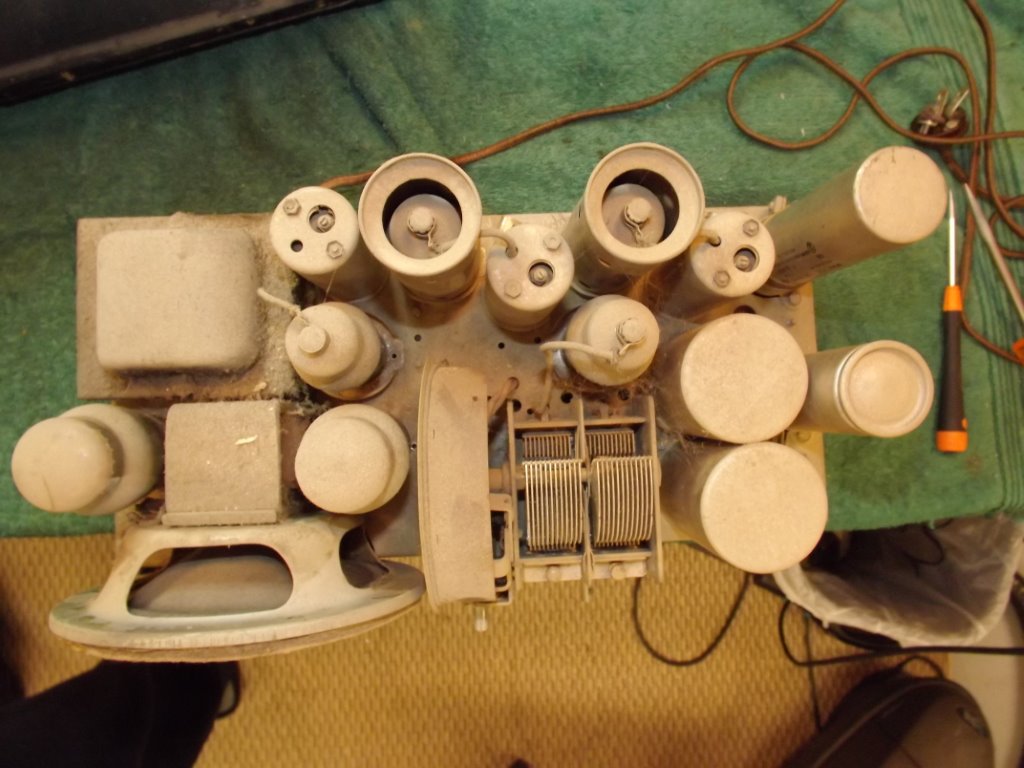
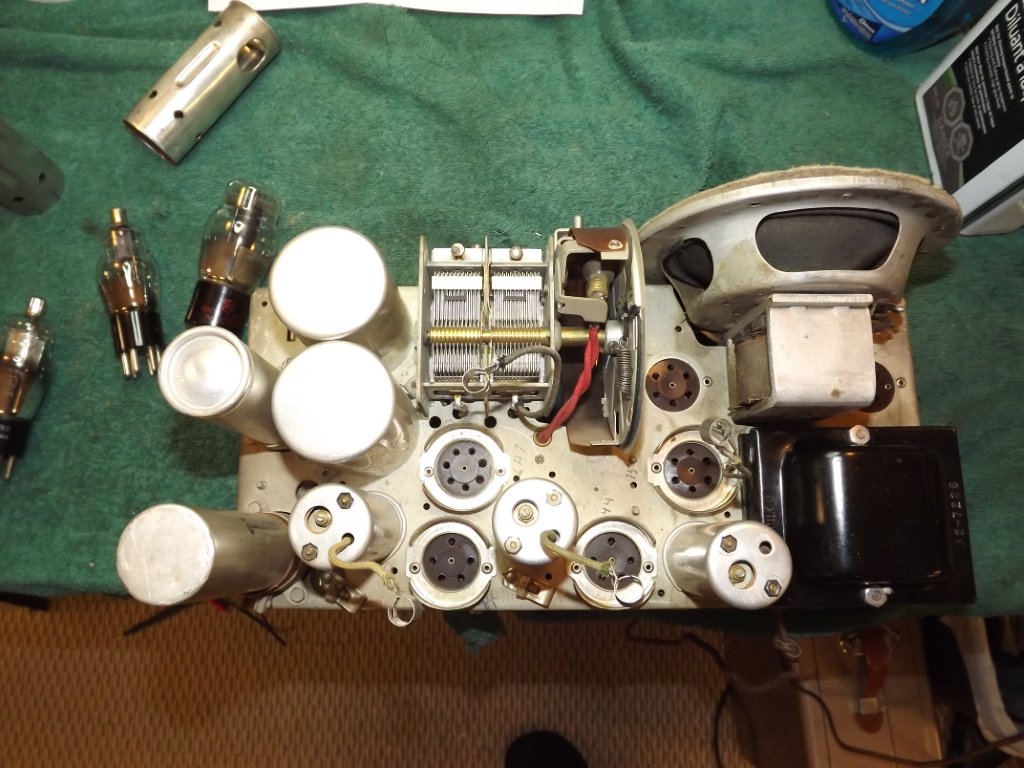
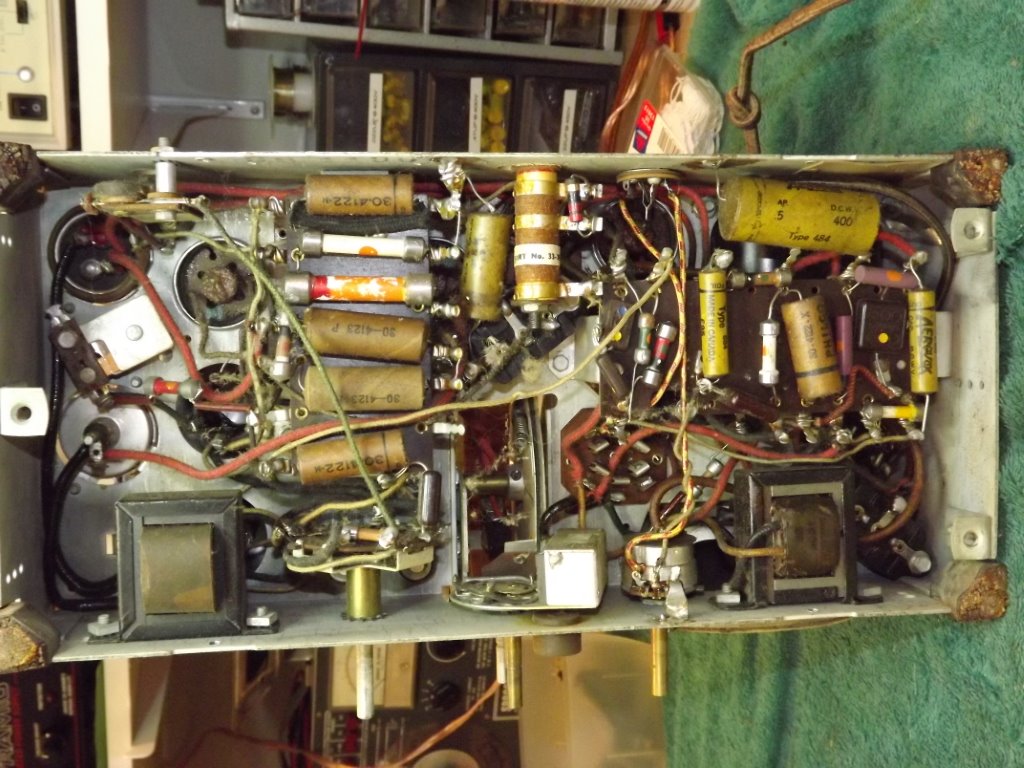
I have completed the chassis on my Canadian 345 Butterfly and thought I would share some before and after pictures. Special thanks goes to Oldrestorer who assisted with some parts!
All caps have been restuffed, all resistors checked and only two replaced. It had a bunch of different tubes in it and the 42 and 75 were both weak so all Philco tubes have been installed. The original line cord was in good shape but the plug was broken so a new vintage one was installed. New grommets were installed under the tuner and a new dial light was installed. I am very pleased with the outcome and it works and sounds excellent.
Top as it came from the cabinet.

Top after cleaning.

Bottom before restoration.

Bottom after restoration.

Gregb
(This post was last modified: 02-21-2014, 09:52 PM by gregb.)
Posts: 16,226
Threads: 563
Joined: Oct 2011
City: Jackson
State, Province, Country: NJ
Greg,
Excellent job. Looks like yesterday from the factory.
Posts: 669
Threads: 145
Joined: Jun 2011
City: Elko,MN.
Looks nice.
Alot of work re-stuffing all those caps.
I don't have the patience to go that route.
I see you eliminated that large type 484 cap in the upper right of the picture.
Was that added by someone else in the past?
Anyway, good job.
murf
Posts: 16,226
Threads: 563
Joined: Oct 2011
City: Jackson
State, Province, Country: NJ
There are several caps that have been removed.
Posts: 599
Threads: 24
Joined: Jan 2014
City: Edmonton AB CA
The after is exactly as is should be, the missing caps were previous repairs that I removed and replaced with the proper part number restuffed cap. Radios that I plan on keeping I will go the extra mile to make it as perfect as I can. Some might think its overkill and they may be right but this is the part of the hobby that I enjoy the most.
Like I said in another thread I would love to do this to a 38-690.
Thanks Morzh for the kind words.
Gregb
Posts: 16,226
Threads: 563
Joined: Oct 2011
City: Jackson
State, Province, Country: NJ
Did you paint the xfmr or it only needed cleaning?
Posts: 1,114
Threads: 14
Joined: Feb 2013
City: Irvington, NY
That's a beautiful restoration job Greg. I wish more people would spend the extra time and effort to bring their radios to that level of originality.
Eventually, there will be very few radios which work and retain the function and appearance of their original factory components.
Posts: 599
Threads: 24
Joined: Jan 2014
City: Edmonton AB CA
Only needed cleaning, that's the one nice thing about radio collecting in western Canada. We don't have many radios but the ones we do have tend to have nice clean rust free chassis. Its very dry here and rust is something I don't usually see unless the radio was stored outside.
Gregb
Posts: 5,125
Threads: 271
Joined: Nov 2012
City: Wilsonville
State, Province, Country: OR
Posts: 599
Threads: 24
Joined: Jan 2014
City: Edmonton AB CA
Mondial, Thank you, I have come to the same conclusion. I have repaired/restored 1000's of radios over the years and was thinking about what the future holds for collectors. They wont know what an original radio chassis looked like. So for now on all my keeper radios get the full meal deal and brought back to as close to original as I can.
Gregb
Posts: 599
Threads: 24
Joined: Jan 2014
City: Edmonton AB CA
Posts: 1,114
Threads: 14
Joined: Feb 2013
City: Irvington, NY
Greg, do you put a note inside the chassis stating that all the paper caps have modern replacements inside? I have been giving this some thought myself on some of my radios given the full treatment.
I can just see someone many years from now seeing all those wax caps and replacing them before ever powering up the set, never realizing they were restuffed with modern film caps.
Posts: 5,125
Threads: 271
Joined: Nov 2012
City: Wilsonville
State, Province, Country: OR
Mondial, I think that's a great idea. I'm working on a 39-25 that I think still has the original paper caps but they are cleaner than normal and I'm now wondering if they were stuffed at some point. I'll know when I take a closer look but a note on what was done in the past would sure be helpful. I did some work on a 48-482 and gave it to my son for Christmas and put a write up of what was done in an envelope that went with the radio. No guarantee the envelope and radio will stay together but then again they might and 20 or 30 years from now someone might be glad it was there.
Posts: 599
Threads: 24
Joined: Jan 2014
City: Edmonton AB CA
I do include a copy of any service info I can find on the radio and write on the back the date and what I did to it.
Gregb
Posts: 4,806
Threads: 54
Joined: Sep 2008
City: Sandwick, BC, CA
Murf;
It's actually not that difficult to restuff tubular paper caps, especially with those axial lead polyester film types, once you develop a technique. As an experiment I did this on a Rogers Ten-60 chassis, many of the originals were Auto Lite brand caps which i thought was interesting. What I did was to take out about four at a time and bake them in a toaster oven until the wax melted and I could pull out the innards with a pair of pliers. Then I took each empty tube, placed it on end, and stuck it back in the oven to let the remaining wax drip out. And extra residue I cleaned up with varsol and or lacquer thinner.
To restuff each paper cap, I made a strip out of cardboard and wrapped it around the new film cap as a shim, and then wedged it into the old tube, some needed a thinner strip, some thicker. Then I filled up each end with a glue gun to mimic the old wax plugs. I haven't been able to find brown glue sticks yet so I settled on an opaque whitish type.
I would not do this with every radio, only all original ones or the more collectable types. It isn't worth doing with a late 40s AC/DC full of replacement bumble bee/Sangamo Little Chiefs for example, but for something like a G.E K-80 it might be.
Regards
Arran
Users browsing this thread: 1 Guest(s)
|
|
Recent Posts
|
|
Philco 91 Restore Code ??
|
| Thanks Mike. I at least know why it is there if I don't fully understand it. I see where you talk about a cap and resist...dconant — 04:49 PM |
|
Philco 91 Restore Code ??
|
| Well, this cap you showed cannot possibly, due to the way it is constructed, be 1000pF (0.001).
It can be in tens of pF....morzh — 03:13 PM |
|
Philco 91 Restore Code ??
|
| I have two schematics for this radio one shows the 47 block (126-226) and the other (121-221) does not. My radio does no...dconant — 02:32 PM |
|
Philco 91 Restore Code ??
|
| No, that cannot be the 47.
The 47 is a regular backelite block cap. Look at the chassis picture, it is shown there. Rig...morzh — 01:45 PM |
|
Philco 91 Restore Code ??
|
| I have changed the title of this thread from Philco 91 Schematic.
I have gone through most of the cap replacements. I...dconant — 01:26 PM |
|
462ron
|
| Here is an online transistor substitution site…
Ron462ron — 08:44 AM |
|
1930s Stewart-Warner Tombstone Radio need help identifying model number
|
|
One way to repair a broken wire on a coil is to take a copper strand out of some 18 gauge electrical cord, make a &quo...captainclock1988 — 12:55 AM |
|
B&K 1077B no video
|
| Hello Tim,
I once had a Jcpenny 13inch tv /monitor built by NEC come into my repairshop it would start acting up at tim...radiorich — 10:59 PM |
|
Restoring Philco 96
|
| Mike;
The last time I took a potted condenser can apart, and it was maybe 1/4 the size of the one in the model 96, I ...Arran — 10:56 PM |
|
Compatible crts
|
| Bob Andersen — 08:58 PM |
|
Who's Online
|
There are currently 2955 online users. [Complete List]
» 3 Member(s) | 2952 Guest(s)
|
|
|

|
 
|


![[-] [-]](https://philcoradio.com/phorum/images/bootbb/collapse.png)


