Philco 40-145 Cabinet Repair
Posts: 761
Threads: 56
Joined: Jul 2013
City: Kentucky

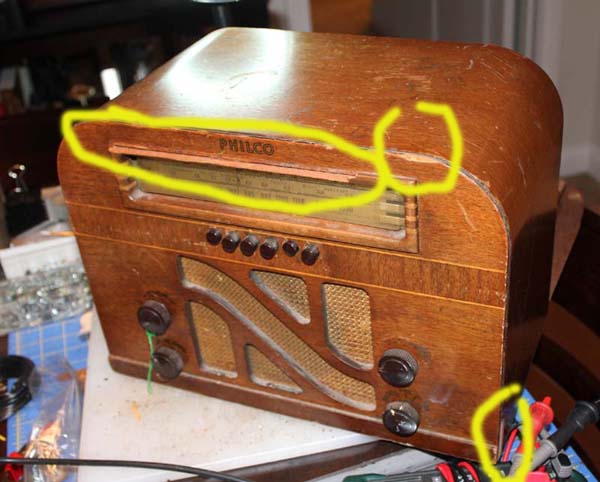
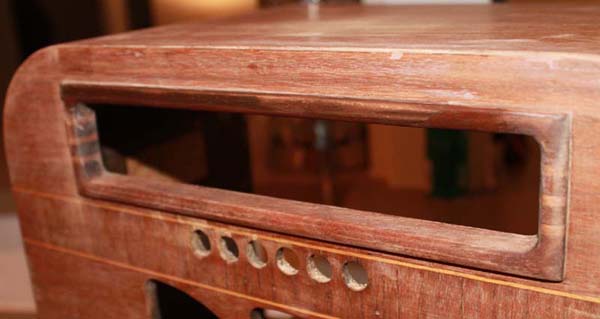
Here is the victim. A Philco 40-145 I picked up at a flea market. The major problem was the wooden surround on the dial. Most of the top was missing. There were also issues with the veneer. Pieces were missing from the top right above the dial, and on both sides. The bottom right was a pretty big chunk that was gone. Also, above each push button, the veneer was gone.
The artist formerly known as Puhpow! 8)
(This post was last modified: 09-12-2013, 05:11 PM by Jamie.)
Posts: 761
Threads: 56
Joined: Jul 2013
City: Kentucky
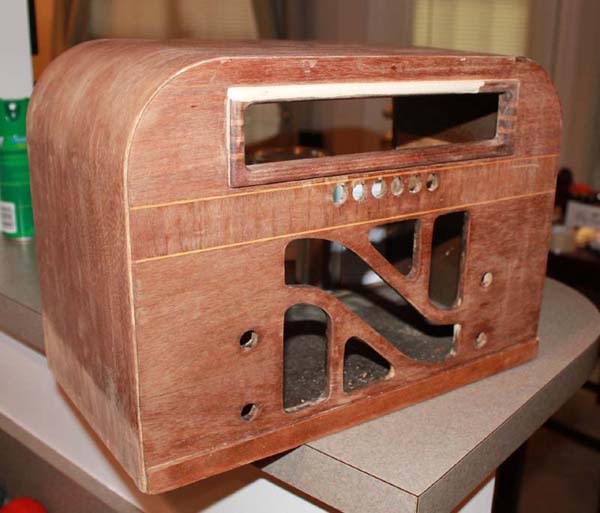
After stripping the cabinet, I started off by gluing a piece of 1/4" x 1/4" inch wood stock onto the dial face. It was fairly soft wood, and the photo shows I have already sanded it into the rough shape needed.
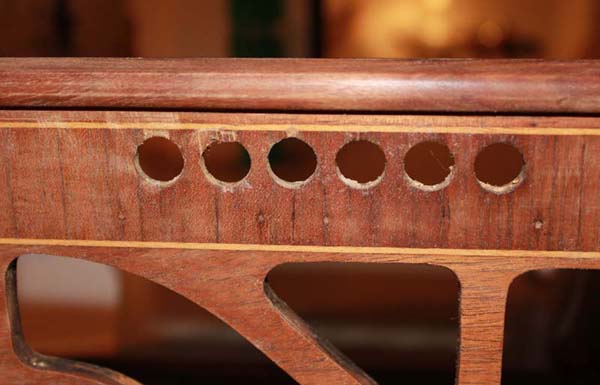
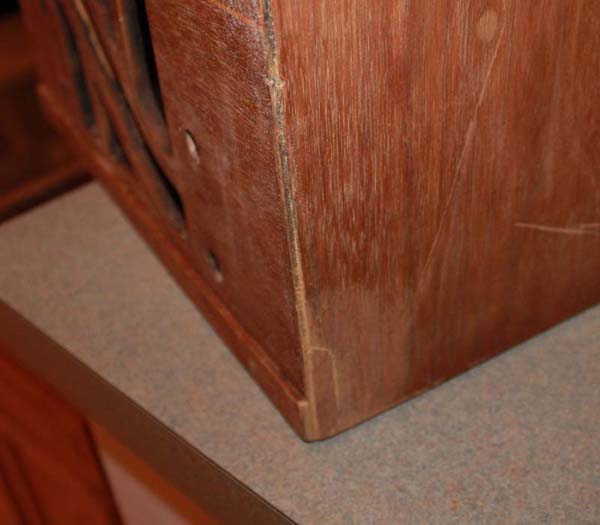
Veneer scraps were cut and glued into the missing areas. I also did the places above each push button and the face of the radio. After the glue dried, 400 grit sandpaper was used to even them up with the surface of the radio.
The artist formerly known as Puhpow! 8)
(This post was last modified: 09-12-2013, 05:20 PM by Jamie.)
Posts: 761
Threads: 56
Joined: Jul 2013
City: Kentucky
The artist formerly known as Puhpow! 8)
(This post was last modified: 09-12-2013, 05:30 PM by Jamie.)
Posts: 761
Threads: 56
Joined: Jul 2013
City: Kentucky
Ready for toner and clear...
The artist formerly known as Puhpow! 8)
Posts: 761
Threads: 56
Joined: Jul 2013
City: Kentucky
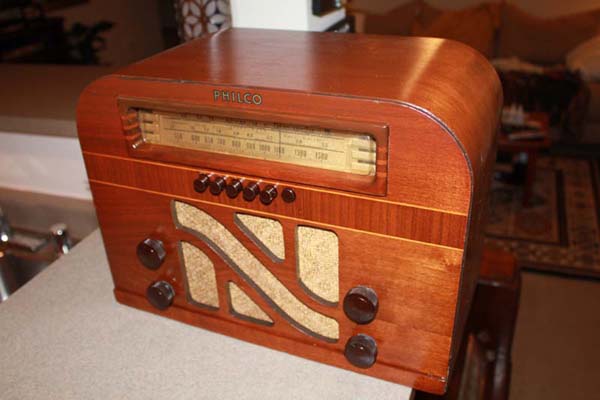
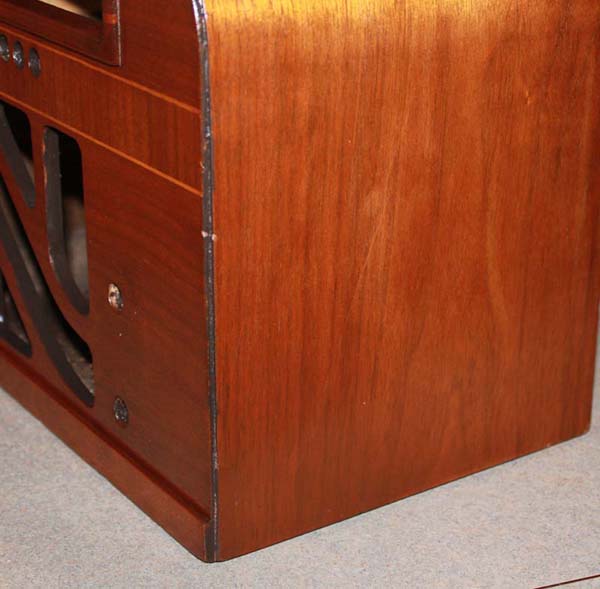
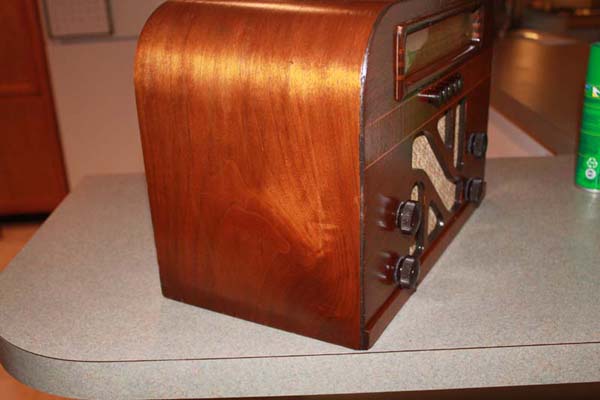
All finished and singing a 40's tune! Please ignore the light area on the bottom photo - my camera does that. I assure you, the finish looks fine in real life.
Is it perfect? Nope. But it's good enough for government work. I wish I had used a lighter colored stain on the new wood, but it is what it is. Next time, I'll know better.
You can see how well Timber Mate works. The repairs on the veneer are virtually invisible. I am very pleased with the veneer repairs. As for the wood around the dial? It's the best I could do and I think it came out well. It shows that almost any radio can be fixed.
The artist formerly known as Puhpow! 8)
Posts: 139
Threads: 8
Joined: Aug 2013
City: Central PA
Very nice work and results! Thanks for sharing the process - it's a great way to learn. You've got quite a little beauty there!
So how long was the overall process, you've made it look like it just a few hours...
Posts: 761
Threads: 56
Joined: Jul 2013
City: Kentucky
Thanks! Umm.. I bought the radio about 10 days ago.. maybe two weeks. The first photo was taken then. The radio sat around for a few days, then I did the chassis first.. that took a couple of days. Started working on the cabinet three days ago.. I stripped it on Monday, glued the wood to the dial on Tues, glued the veneer on yesterday and did the rest today. I started working on it at 8am today (sanding the veneer, I had already shaped the wood piece), and I finished up right before I posted this thread. It was pretty quick. It's a small radio and it doesn't get a piano finish.. so no grain filler or any polishing needed.
The artist formerly known as Puhpow! 8)
(This post was last modified: 09-12-2013, 06:49 PM by Jamie.)
Posts: 1,531
Threads: 242
Joined: Sep 2012
City: West Bend, Wisconsin
 Excellent work! I have one of these myself. It's a nice little set.
Greg V.
West Bend, WI
Member WARCI.org
Posts: 1,531
Threads: 242
Joined: Sep 2012
City: West Bend, Wisconsin
Just noticed... yours, like mine, is missing the brass station call letter enclosure under the pushbuttons. I suspect previous owners nabbed them and sold 'em for brass scrap!
Greg V.
West Bend, WI
Member WARCI.org
Posts: 2,573
Threads: 337
Joined: Jun 2013
City: lawrenceville nj
Great job looks fantastic
Posts: 481
Threads: 18
Joined: Jan 2013
City: Mesa, AZ
Very nice, indeed!!! 
Posts: 761
Threads: 56
Joined: Jul 2013
City: Kentucky
Thanks guys. I've got a small radio that needs to be stripped and refinished. No woodwork needed. If you'd like, I can post a step-by-step thread with photos. It would be sort of geared towards the first time refinisher. I plan to start on it today. Let me know if you think it's something you'd like to see.
The artist formerly known as Puhpow! 8)
(This post was last modified: 09-13-2013, 08:12 AM by Jamie.)
Posts: 13,776
Threads: 580
Joined: Sep 2005
City: Ferdinand
State, Province, Country: Indiana
Absolutely!
--
Ron Ramirez
Ferdinand IN
Posts: 761
Threads: 56
Joined: Jul 2013
City: Kentucky
Ok, done deal. I've got some work to do. I'll get started on the thread when I get back home this afternoon.
The artist formerly known as Puhpow! 8)
Posts: 5,141
Threads: 272
Joined: Nov 2012
City: Wilsonville
State, Province, Country: OR
Users browsing this thread: 1 Guest(s)
|
|
Recent Posts
|
|
Gloritone 27 Radio
|
| I have a model 27 that someone painted the cabinet brown. I've been trying to sell it for awhile but the cabinet paint m...Jim Dutridge — 02:30 PM |
|
Restoring Philco 96
|
| Joseph
Yeah. The situaction is complicated by me living with my family in NJ while mom is in FL.
Were it not for my ...morzh — 10:55 AM |
|
Restoring Philco 96
|
| Best of wishes for your mother. I hope she recovers well. My mother struggles with sciatic pain as well, so I am familia...jrblasde — 10:41 AM |
|
Restoring Philco 96
|
| Well, because I am away, I cannot check it. Hope mom becomes better enough for me to get back.
I think I will be here f...morzh — 10:27 AM |
|
Restoring Philco 96
|
| Nice find! I hope it completes your console.jrblasde — 08:45 AM |
|
Gloritone 27 Radio
|
| Hello john,
That, is the first time I have have seen or heard of that brand and model.
Welcome to the party !!
Sincer...radiorich — 08:08 AM |
|
370 Norman Bel Geddes trim pieces
|
| Thank you! I’ll probably use the half-round molding and tone it to match the original. Thanks for the replies!Max T — 06:34 AM |
|
Gloritone 27 Radio
|
| I'm kind of late to this thread, but Buzz1151 has a 3 part restore series on the model 27:
A little bit of extra t...Eliot Ness — 05:48 AM |
|
370 Norman Bel Geddes trim pieces
|
| You can get half-round moulding in various diameters at any home improvement store. That way the flat edge is uniform. ...GarySP — 12:03 AM |
|
42-345 Resistors
|
| Great comments.
I have a tinkering bench at my office, and that's where Little Phil is right now. I will have to comb ...proftrussell — 11:12 PM |
|
Who's Online
|
| There are currently no members online. |

|
 
|


![[-] [-]](https://philcoradio.com/phorum/images/bootbb/collapse.png)


