Any
antique radio collector or restorer that is familiar with Philco radio models from the 1930's through the 1940's has probably seen those black bakelite containers that house wax/paper bypass and coupling capacitors, or condensers
as they were originally called. A typical Philco chassis from this era usually has a few of these capacitors. See Figure 1. (Click on all the figures for a larger image.)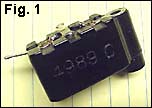 These containers came in at least four varieties with each variety having from 7 to 20 variations of connections and values
(see chart). Knowing the capacitor's values and lug wiring makes rebuilding them a snap. Philco many times added an extra terminal to the block capacitor simply as a tie-point or junction to hold other wires or components. There was no internal connection to any capacitors within the block for this unused terminal. Replacing the innards with modern parts insures that they will far outlast the original part and give your repaired chassis the original look without visible modern substitutes added to the chassis. I think keeping the radio in as much of its original state
has merit, even when the parts are not visible once the radio is back in the cabinet. Also, when adding newer parts, you may not always have enough space to add in the extra parts in a crowded chassis.
 These containers came in at least four varieties with each variety having from 7 to 20 variations of connections and values
(see chart). Knowing the capacitor's values and lug wiring makes rebuilding them a snap. Philco many times added an extra terminal to the block capacitor simply as a tie-point or junction to hold other wires or components. There was no internal connection to any capacitors within the block for this unused terminal. Replacing the innards with modern parts insures that they will far outlast the original part and give your repaired chassis the original look without visible modern substitutes added to the chassis. I think keeping the radio in as much of its original state
has merit, even when the parts are not visible once the radio is back in the cabinet. Also, when adding newer parts, you may not always have enough space to add in the extra parts in a crowded chassis.
Most of these bakelite condensers suffer from old age and should be replaced or rebuilt. The old condensers usually went bad with age after a time. The condenser would swell and start pushing the plug of tar up and out of the bakelite shell. They are usually found in this condition and are good candidates for rebuilding. The rebuilding process is fairly straightforward; the shell
and its solder lugs remain intact and the plug of tar and the old condenser are removed. The new part is installed and soldered in place and the shell optionally refilled with hot glue or left as is. There are no special tools needed for this project; just your soldering iron, a stiff piece of medium gauge wire, a small wire cutter, small needle-nose pliers, a heat gun, and the new capacitors.
The first step is to identify the type of condenser and what part or parts it contains. You will most often find the Philco Part Number stamped onto the side of the blocks. For example; one of the most common units found in a chassis is part number 4989C, as in Figure 1. The original unit contains two .09 microfarad (mF) condensers used to bypass both sides of the incoming power cord. Their voltage rating was probably 300-400 volts. Since you can't find the .09 mF value anymore the closest value is 0.1 mF. (Note that the replacement values used in this rebuilding process will vary slightly from the original values, but this will not harm or change operation of the radio in any way.) The voltage rating on the new parts I use is least 400 volts and usually 630 volts. This way they can be used for any application in a radio chassis. The other capacitor "equivalents" I use are a .022 mF value as a substitute for the .015 mF parts in the 3793 series and a .047 mF for the .05 mF parts in the 3615 series condensers. Some of the Philco condensers also included a resistor (see chart).  The original resistor is a small hank of light gauge resistance wire, in the required amount, wrapped inside a small kraft-paper wrapping. I assume from inspecting the size of the wire, that these resistors are
rated at about a half-watt. Substituting a new carbon or carbon film half-watt part will work just fine.
 The original resistor is a small hank of light gauge resistance wire, in the required amount, wrapped inside a small kraft-paper wrapping. I assume from inspecting the size of the wire, that these resistors are
rated at about a half-watt. Substituting a new carbon or carbon film half-watt part will work just fine.
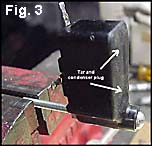
Now you're ready to clean out the old tar and condensers from the bakelite shell. In order for the "guts" to slide out of the shell, the internal condenser leads to the solder lugs on the shell need to be cut where they exit the rivets, see red arrows in Figure 2. From your hardware junkbox, pick a 3 to 4 inch #6 screw and nut to fit. Mount the bakelite block on the screw and clamp it in a bench vise as shown in Figure 3. Now use the heat gun on LOW and thoroughly heat the outside surfaces of the shell equally. DO NOT heat the tar plug directly! This will not only make the outer layer of tar soften and drip, but it will generate a lot of smoke and odor. If the tar starts to smoke, back off on the distance from the heat gun nozzle. 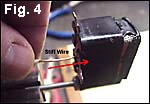 The object here is to heat the shell enough to soften the inside surfaces of the tar in order to push it out, but not so much to make the tar run or drip. Once the tar is heated enough to slide out, use the stiff piece of wire to gently put pressure on the plug by inserting the wire into the center rivet hole from the terminal side (See Figure 4).
 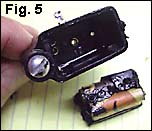 Be careful not to use too much pressure as the bakelite easily cracks. As long as you are continually applying heat, the tar should soften enough for an easy slide out. From my experience, this takes only a few minutes and does not make the work area smell like the roofing truck just left. Figure 5 shows the empty shell, ready for cleaning. I use cotton swabs dipped in lacquer thinner.
USE A WELL VENTILATED WORKSPACE FOR THIS - THE LACQUER FUMES ARE FLAMMABLE!
 The object here is to heat the shell enough to soften the inside surfaces of the tar in order to push it out, but not so much to make the tar run or drip. Once the tar is heated enough to slide out, use the stiff piece of wire to gently put pressure on the plug by inserting the wire into the center rivet hole from the terminal side (See Figure 4).
  Be careful not to use too much pressure as the bakelite easily cracks. As long as you are continually applying heat, the tar should soften enough for an easy slide out. From my experience, this takes only a few minutes and does not make the work area smell like the roofing truck just left. Figure 5 shows the empty shell, ready for cleaning. I use cotton swabs dipped in lacquer thinner.
USE A WELL VENTILATED WORKSPACE FOR THIS - THE LACQUER FUMES ARE FLAMMABLE!
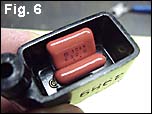
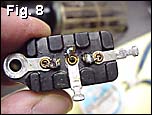
After the inside of the shell is cleaned of leftover tar and bits of condenser, de-solder the leftover wires and solder from the terminal lugs on the shell. This will make it easier to wire in the new parts and make a clean looking repair as well. Bend the ends of the lead wires of the new capacitors to fit into the eyelets from the inside. Use the chart to determine the internal connections for your particular bakelite block type. Position the new parts so they snug down into the shell (See Figure 6). 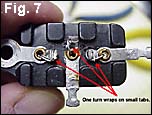 In some cases where there are two or more parts, mount them side-by-side without crossing any bare leads that could cause an internal short. Take the small needle-nose pliers and make a one turn wrap around the shorter tabs on the solder lugs. Solder the leads and snip the excess wire. Now and you're ready to re-mount the block into the chassis and restore its connections. (See Figures 7 and 8).
 In some cases where there are two or more parts, mount them side-by-side without crossing any bare leads that could cause an internal short. Take the small needle-nose pliers and make a one turn wrap around the shorter tabs on the solder lugs. Solder the leads and snip the excess wire. Now and you're ready to re-mount the block into the chassis and restore its connections. (See Figures 7 and 8).
 The steps illustrated above are not gospel when it comes to re-building these parts. My procedure gives me the most success in the least amount of time. From start to finish in this way, a typical block is re-built in about 20-30 minutes. You may already have your own favorite way of re-building these bakelite block condensers that works for you and that's alright. There's always more than one way to "skin a cat."
Some people like to re-fill the shell with hot glue or other potting material, which is optional. This potting step is really not necessary, since the new parts installed have much better specs than the old wax-paper/foil parts and won't suffer from moisture effects. Your refurbished bakelite block condenser will now last much longer than the original, the physical appearance has not changed, and the repair is invisible once the block is back in the radio.

